12767 Steam Clean And Wheel Grind Shop
Replacing Lionel's Control Box -
Option 1
(free hanging receptacles)
This How-To project is shared so a replacement can be made of
Lionel's original controller.
Option 1, described here, is the recommended solution.
Lionel made the Steam Clean And Wheel Grind Shop in 1992, 1993, 1995 and the Controller is no longer available from Lionel. When this three part accessory is acquired, the controller may be missing. DC power is required for operation. If any of the sections were operated with AC current they may be damaged. The following Replacement Controller is based on Lionel's Controller.
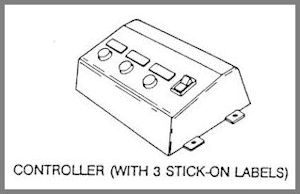 Lionel's Controller Part # 610-2767-123 Controller Complete For Instructions, see Lionel's Manual. |
Lionel's Controller in use in the SSPRR Run Room. Lionel shipped the controllers with the white labels ready to apply in the order each of the three parts were installed on the track. |
|
| Completed Replacement Controller |
Lionel's Original Controller for Pattern
|
Lionel's box is 4" x 6" x 2" deep. Inside Lionel's Controller ---------g |
|
Circuit Board Top and Bottom (print each, flip one side to side, stick together)
|
|
|
Wiring Circuit Diagram of Above
Controller Replacement
For "proof of concept" two controllers
were constructed. One replacement was sold and the other is
For Sale.
Duplicating Lionel's Box (Option 2) is not advised. Use
this
Option 1 (free
hanging connectors).
|
The back of the replacement shows Option 2 for DC plugs to the three sections. Option 2 is a Vertical Pin Header Strip from Scratch which is not recommended. Just drill 3 round holes in the back and use Option 1 which is free hanging connectors. |
Replacement Box Bottom |
Materials Purchased
Xs Not Used Replacement box is 6.18" x 3.78" x 2".
| 1 spst on/off
power switch (to fit in round hole) 3 mom sp switches 9-Position Terminal Strip. PC Mount (clip off back prongs) 4 3A 400V standard silicon rectifiers 1 2200 microfarad 25V capacitor Mouser Part #: 667-ECO-S1EA222BA Box (Lionel box is 4" x 6" x 2" deep) Optional PTC Resettable Breaker, click for info |
Wirenuts Hook up Wire 12-14 V AC Power Cord from transformer Surplus Materials Polarized free hanging pin and socket connectors, Option 1 Molex parts are shown below. or Custom Vertical Pin Header Strip (not recommended) Option 2 use 1/16" brass rod and 3/32" brass tubing |
Prepare Box for Option 1. Print Box Top Drawing for Option 1 and 2. See Option 2 here.
Mark and Drill Holes to Fit Switches and Wires In and Out
| Tools Spring-Impact Center-Marking Punch 1/8" to 1/2" Unibit 3/16" to 7/8" Unibit Mark hole locations with Punch. Drill starter holes with 1/8" bit. Use 1 3/8" centers spacing for MOM switches and Option 1 DC wires out of back. |
Layout for Top |
|
|
Arrow shows Back AC Wire entry. For Option 1 replace slots with 3 DC 3-wire exit holes. Option 2 assembly is shown here |
|
|
|
Size holes for Switches with drill index
or calipers. Mark Unibit depth with black marker.
Unibits cut plastic without grabbing.
Wiring for Option 1 - Use Color Coded Diagram here.
|
Wire Rack |
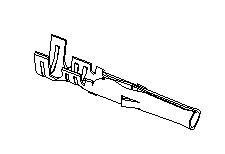
Molex Parts and Tools (tools are nice but not needed) For extraction tool, use metal tubing. Use other crimp tool or pliers. (buy extra metal crimp sockets) |
Polarized Free Hanging Pin and Socket
Connectors
Plugs and Receptacles can be Purchased With or Without tabs.
Clip off tabs.
Illustrations are from the mouser.com catalog.
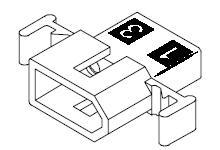 Plug from Box |
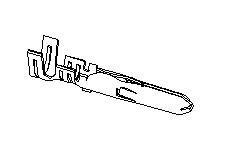 |
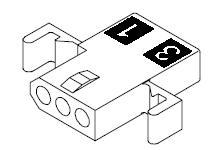 Receptacle Replaces Accessory Receptacle |
 |
| Pin & Socket
Connectors 3 CIRCUIT PLUG (buy 3) Mouser Part #: 538-03-06-2032 Molex Part #: 03-06-2032 |
Male Crimp Socket
(buy 9 + extras) Mouser Part #: 538-02-06-2103 Molex Part #: 02-06-2103 |
Pin & Socket
Connectors 3 CIRCUIT RECEPTACLE (buy 3) Mouser Part #: 538-03-06-1032 Molex Part #: 03-06-1032 |
Female Crimp
Socket (buy 9 + extras) Mouser Part #: 538-02-06-1103 Molex Part #: 02-06-1103 |
Made up Wiring Ready for Connections
(from Color Coded Diagram)
Option 2 Custom Vertical Through Pin Header Strip Shown in Place of
Option 1 Pin &
Socket Connectors
|
Switches and Option 2 Header Installed For Option 1, the Wired 3 Circuit Plugs would be hanging out. Wires to be connected are twisted together. The screw clamp terminal strip is not attached to the box. |
Wirenuts should have a twisted metal coil as shown in the ivory wirenut example indicated by yellow arrow. Wirenuts can be used safely in junction boxes. Gray wirenuts were used for yellow 2 wire connections. |
Completed Controller
|
|
LABELS
Top Labels
SUBSTITUTE LIONEL
CONTROLLER
for Steam Clean,
Washer, Wheel Grind Shop
READ INSTRUCTION MANUAL PRIOR
TO OPERATION
OPERATING VOLTAGE 12 TO 14 VAC
ON OFF WHEEL GRIND TRAIN WASH STEAM CLEAN ___________________________________________________________ Back Labels - AC Voltage In ←----- Circuit is protected with a
PTC Resettable Fuse.
When fault shuts off power, reset by disconnecting
AC power, wait 30 seconds, and restore AC power.
___________________________________________________________
Bottom Label
(Lionel's
Control Box Part # is 6102767123.)
Download
Instruction Manual at
http://www.lionel.com/media/servicedocuments/71-2767-250.pdf ___________________________________________________________ |
Test Electrical In and Out
Voltages: Test Input - 14 volts AC Test Output - Under no load 16 to 18 volts DC
Return to Operating Cars and Accessories
